6 Small Closet Fixes That Make It Feel Twice the Size
Are you all about style, decor and organization? Download a copy of our Decluttering Workbook.***** Small closet organization isn’t about buying more bins. It’s about fixing the real bottlenecks — volume, layout, […]
Are you all about style, decor and organization? Download a copy of our Clutter Reset Guide. ****
If you love Vintage Easter Decor, you already know the difference. Some porches feel warm, layered, and thoughtfully gathered over time. Others feel like a themed aisle exploded onto the front steps.
The secret isn’t buying more. It’s layering better.
Today I’m walking you through a repeatable vintage layering formula you can use every year. It works for Easter Porch Decor of any size and helps your Easter Spring Decorations feel curated instead of staged.
The formula is simple:
Anchor → Height → Texture → Repeat
We’ll apply it across three porch zones: the door zone, the step zone, and the side vignette zone.
Stick to a tight color story. Soft pastels work beautifully for Easter Spring Decorations, but keep them dusty and muted rather than bright and glossy.
Step 4: Repeat One Element (So It Feels Intentional)
Here’s what separates curated from chaotic: repetition.
Not matching. Repetition.
Choose one element and echo it 2–3 times across zones:
The same ribbon on wreath and basket handles
The same type of greenery in multiple spots
The same woven material in different shapes
The same pastel tone repeated subtly
For example, if you use faded blush ribbon on the wreath, repeat it tied loosely around a lantern handle and tucked into a basket.
That visual echo tells the eye everything belongs together.
Break Your Porch Into 3 Styling Zones
Instead of decorating randomly, divide your porch mentally into zones.
This keeps Easter Porch Decor balanced and prevents over-decorating.
1. Door Zone
Wreath as focal point
Optional small side accent (lantern or crocks)
Keep symmetry relaxed, not strict
Let this be your strongest moment.
2. Step Zone
Grounded cluster
One tall piece, one medium, one soft filler
Negative space around the grouping
Don’t stretch decor across the entire width. Concentrate it.
3. Side Vignette Zone
Smaller scale moment
Stool, basket, or vintage chair
Light greenery and subtle Easter accents
This zone supports the main area rather than competing with it.
What Makes a Porch Look “Themed” (And How to Avoid It)
If your setup feels off, it’s usually one of these:
Too many identical bunny figurines
Bright, shiny finishes
Everything purchased from one collection
No variation in height
No visible wear or age
Every inch filled
Remove one item and reassess. Collected design almost always benefits from subtraction.
How to Thrift for Vintage Easter Decor
The best Easter Porch Decor rarely comes from seasonal shelves.
Look year-round for:
Baskets in varied sizes
Old crates
Crocks and enamelware
Neutral planters
Aged lanterns
Focus on texture and shape rather than holiday labels.
Then when Easter comes, you only need to add small seasonal touches:
A ribbon swap
A nest tucked into greenery
A few muted eggs
A simple bunny silhouette
This keeps your Easter Decoration Ideas flexible and reusable.
The Formula to Use Every Year
Are you all about style, decor and organization? Download a copy of our Clutter Reset Guide.
Are you all about style, decor and organization? Download a copy of our Clutter Reset Guide. ****
If you want your home to feel Easter-ready without decorating every single room, start with your entry.
The entryway is the first impression. It quietly sets the tone for everything that follows. And the best part? You only need one styled surface to shift the entire feel of your home.
This guide will walk you through a simple 3-layer system for Easter Spring Decorations that works even on slim consoles and narrow entry tables.
You don’t need to decorate the whole house. One thoughtfully styled entry table using layered Easter Spring Decorations can shift the entire feel of your home in a single afternoon.
And once you see how much difference three simple layers make, you’ll never go back to scattering decor again.
Are you all about style, decor and organization? Download a copy of our Clutter Reset Guide. ****
If you love farmhouse Easter decor ideas but your mantel keeps feeling crowded, you’re not alone.
Garlands are soft and pretty in theory. But once you add mini wreaths, bunnies, candles, and pastel accents, everything starts fighting for attention. Instead of looking intentional, it feels busy.
The fix is not buying less. It’s spacing better.
This simple layout formula will help your farmhouse Easter decor feel balanced, layered, and calm — without looking themed or overdone.
Think of your mantel like a styling map. Instead of decorating edge to edge, you’re creating zones with space between them.
Step 1: Start With One Strong Anchor
Before you hang the garland, choose your anchor.
This could be:
A large mirror
A vintage farmhouse window frame
A substantial wreath
A wood-framed sign
Your anchor should visually “hold” the entire display. Without it, the garland feels like it’s floating.
In farmhouse Easter decor ideas, natural wood, whitewashed frames, or neutral round mirrors work beautifully because they ground all the softer Easter spring decorations around them.
Step 2: Drape the Garland With Intention
Now add your garland — but don’t just toss it across.
Follow these spacing rules:
Keep the garland 1–2 inches back from the edge
Allow a soft, natural sag (not tight, not dramatic)
Leave 3–4 inches of empty space at each end
That small bit of breathing room instantly prevents crowding.
Whether you’re using greenery, eucalyptus, or pastel egg garland, the goal is softness, not bulk.
Step 3: Use Odd-Number Clusters (The Rule That Changes Everything)
This is where most Easter decoration ideas go wrong.
Instead of spreading small items across the entire mantel, build 2 focused clusters using groups of 3.
Each cluster should include:
One tall piece (candle holder, lantern, tall vase)
One medium piece (bunny figurine, framed art, small wreath)
One grounding piece (stacked books, wooden beads, low ceramic bowl)
Place the clusters slightly overlapping the garland, not sitting completely in front of it.
Then leave 6–10 inches between clusters.
Odd numbers create movement. Even numbers feel stiff and staged.
Step 4: Balance Visual Weight (This Is the Secret Move)
Balance isn’t about symmetry. It’s about weight.
If one side has height, the other side needs density. If one side feels light and airy, the other side may need texture.
Here’s how to check visual weight:
Darker or textured pieces feel heavier.
Taller items pull the eye upward.
Too many small pastel items create clutter.
Farmhouse Easter decor works best when soft pastels are grounded with wood, ceramic, metal, or woven textures.
If your mantel feels “off,” it’s usually a weight issue — not a quantity issue.
Step 5: The “No Crowd” Spacing Guide
Use this quick checklist:
3–4 inches between small items
6–10 inches between clusters
No more than 2 main focal areas
At least one clear patch of visible mantel surface
White space is not empty space. It’s what makes the decor look intentional.
A Balanced Mantel Example
Imagine this setup:
Center anchor: A round wood-framed mirror.
Garland: Soft greenery draped gently across the length.
Left cluster: Tall white candle holder Ceramic bunny Small stack of neutral books
Right cluster: Black lantern Mini wreath leaning behind White vase with light pink stems
Nothing touches edge to edge. There’s breathing room between the clusters. The mirror grounds the entire look.
That’s the balanced garland trick in action.
Common Mantel Mistakes to Avoid
Garland pushed too far forward
Even-number styling
Tiny decor scattered across the full length
Competing focal points
When everything is a focal point, nothing stands out.
The Repeatable Formula You Can Use Every Year
Are you all about style, decor and organization? Download a copy of our Clutter Reset Guide.
Anchor → Drape → Cluster in 3s → Leave space → Check visual weight
You don’t need more decor.
You need a better layout.
Once you follow this formula, your farmhouse Easter decor ideas will look balanced, intentional, and beautifully layered — without crowding your mantel.
The Galentine’s Decor Trick That Makes Any Space Feel Pulled Together
Are you all about style, decor and organization? Download a copy of our Decluttering Workbook.**** A Galentine’s gathering should look warm, personal, and effortless — not like it came straight […]
Let’s face it. Just the word budget is a bit of a bummer! It makes you think about numbers and having to say no to purchases. It makes you feel like you are going to have no fun whatsoever.
But it doesn’t necessarily mean that! Budgeting can actually be a first step to financial freedom.
To having more money, not less. Because it helps you stay on track and make and meet money goals.
Ultimately, it is a tool to help you better track the ins and outs of your wallet, and spend (or save) money on what YOU want to!
Managing your money doesn’t have to feel overwhelming. Budgeting is simply a plan for how you’ll spend and save your money each month. It is a money planner tool to help you get control.
With a budget tracker you can make sure you pay your bills, avoid debt, and work toward the things that matter most to you. Maybe you struggle to save money. If so, a simple budget will help.
A budget shows you exactly where your money goes and helps you make sure you have enough for both your needs today and your goals for tomorrow. It helps you achieve financial stability.
Whether you want to build an emergency fund, pay off credit cards, or save for a vacation, budgeting gives you a clear path to get there.
The good news is that budgeting doesn’t mean giving up everything you enjoy or tracking every penny forever.
This budgeting guide will walk you through everything you need to know. You’ll learn how to set up your first budget, choose a method that fits your life, find helpful tools and apps, and build habits that stick.
What Is Budgeting and Why Does It Matter?
A budget tracks your income and expenses to help you make better money decisions. Learning to budget gives you control over your finances and helps you reach your money goals faster.
What is a Budget?
A budget is a plan that shows how much money you earn and how much you spend. It acts as a guide for making smart choices with your money throughout the month.
When you create a budget, you list all your income sources first. This includes your paycheck, side jobs, or any other money coming in. Then you write down all your expenses, from rent and groceries to entertainment and savings.
The goal is to make sure you aren’t spending more money than you make. A good budget helps you see where your money goes each month. It helps you better live below your means and not above them.
You can spot areas where you might be spending too much and make changes.
Your budget should match your life and priorities. What works for someone else might not work for you. The best budget is one you can actually stick to month after month.
Benefits of Budgeting
Budgeting helps you tell your money where to go instead of wondering where it went. You gain control over wasteful spending and can focus on what matters most to you.
Here are the main benefits you’ll see:
Better spending habits – You become more aware of unnecessary purchases
Emergency fund growth – You can set aside money for unexpected costs
Debt reduction – You can plan extra payments to get out of debt faster
Goal achievement – You can save for specific things like vacations or a new car
Less financial stress – You know exactly where you stand with money
A budget also helps you separate needs from wants. You’ll understand the difference between things you must buy and things you’d just like to have. This clarity makes every dollar work harder for you.
Want to download and monitor your credit for free?
If you want to check your credit report and score whenever you want to then download Credit Karma. This easy app lets you see your credit details whenever you want!
More reading:
How to Create a Budget Step-by-Step
Creating a budget just means organizing your money so you know exactly where it goes each month. You create categories and buckets for your money.
You need to calculate your income, list what you spend, separate needs from wants, and make changes that help you reach your goals.
List Your After-Tax Income
Your after-tax income, or net income, is the money you actually take home after taxes are removed from your paycheck. This is the number you need to build your budget around since it is the actual amount that goes into your bank account.
If you get regular paychecks, check your pay stub to see your take-home amount. Add up all the paychecks you get in a month to find your monthly income.
If you get paid every two weeks, you’ll usually get two paychecks per month, but some months you’ll get three.
Self-employed workers need to estimate taxes first, then subtract that amount from total earnings.
Look at last year’s tax return to help you estimate what you’ll owe. Include all income sources like side jobs, freelance work, or rental income.
Don’t use your gross income (before taxes) because that’s not what you actually have to spend. Using the wrong number will make your whole budget incorrect.
Track Expense Categories
Tracking your monthly expenses means writing down everything you spend money on for at least one month. This shows you exactly where your money goes.
Check your bank statements and credit card statements to see your purchases. Save receipts for cash purchases or write them down in a notebook or phone app. Many people are surprised when they see how much they actually spend.
Add up each category to see your total monthly expenses. This number tells you if you’re spending more or less than your income and in which buckets.
Understand Needs vs. Wants
Essential expenses, or needs, are things you must pay to live and work. Variable expenses, which are frequently categorized as wants, change from month to month and can usually be adjusted.
Your needs and essential expenses include rent, mortgage payments, groceries, utilities, insurance, loan payments, and transportation to work. These are your top priority because you can’t skip them. Calculate how much these cost each month.
Your wants which are variable expenses include dining out, entertainment, hobbies, subscription services, and shopping. You have more control over these costs.
Some variable expenses are also essential, like groceries, but you can adjust how much you spend on them.
A common budget plan is the 50/30/20 approach. You spend 50% of your after-tax income on needs, 30% on wants, and 20% on savings and debt payments. This isn’t perfect for everyone, but it’s a good starting point.
Look at each expense and ask if you really need it. Be honest about what you can reduce or eliminate.
Adjust Your Budget for Success
Your first budget probably won’t be perfect. You need to make changes based on what actually happens with your money.
Compare what you planned to spend with what you actually spent after one month. Did you go over in some categories? Did you spend less in others? Use this information to create a more realistic monthly budget.
If your expenses are higher than your income, you have 3 options:
Start by reducing low-priority spending like subscriptions you don’t use or eating out less often. An app like BillTrim or Rocket Money can help with this.
Set up a system to check your budget regularly. Some people review their budget weekly, others do it monthly.
Update your expense categories when your life changes, like getting a new job or moving to a new home.
Keep at least some money for unexpected costs. Build an emergency fund that covers three to six months of your essential expenses. Start small if you need to, even $25 per month helps.
Make the Most of Your Money
Empower: Get the money management tool to help you control your personal finances. Net worth, future plans, savings planner, and investments, all in one award-winning dashboard.
Easy Budgeting Methods
There are several different types of budgeting strategies out there to help you manage your money.
Figure out which one will work best for you personally. The right approach helps you control your money without making you feel restricted or overwhelmed.
Zero-Based Budgeting
Zero-based budgeting means you give every dollar of your income a specific job before the month starts. Your income minus all your expenses and savings should equal zero.
This doesn’t mean you spend everything you earn. It means you plan where each dollar goes, whether that’s for rent, groceries, debt payments, or savings.
You start fresh each month and create a new budget based on that month’s income and expected expenses. If you earn $3,000, you assign all $3,000 to different categories until nothing is left unplanned.
This method works well if you want complete control over your money or if your income changes from month to month. The zero-based budget approach keeps you focused on your financial goals because no money slips through the cracks.
The downside is that it takes time and effort. You need to review your budget regularly and track your spending carefully.
The 50/30/20 Rule
The 50/30/20 rule splits your after-tax income into three simple categories. You spend 50% on needs, 30% on wants, and 20% on savings and debt payments.
Needs include rent, utilities, groceries, insurance, and minimum debt payments. Wants cover dining out, entertainment, hobbies, and subscription services.
You don’t need to track every single purchase with this method. You just need to make sure your spending roughly matches these percentages each month.
This budgeting system works great if you’re new to budgeting or have a stable income. It gives you flexibility while keeping your spending under control.
The challenge comes if you live in an expensive area where 50% doesn’t cover your basic necessities. You might need to adjust the percentages or try a different method if you’re dealing with high-interest debt.
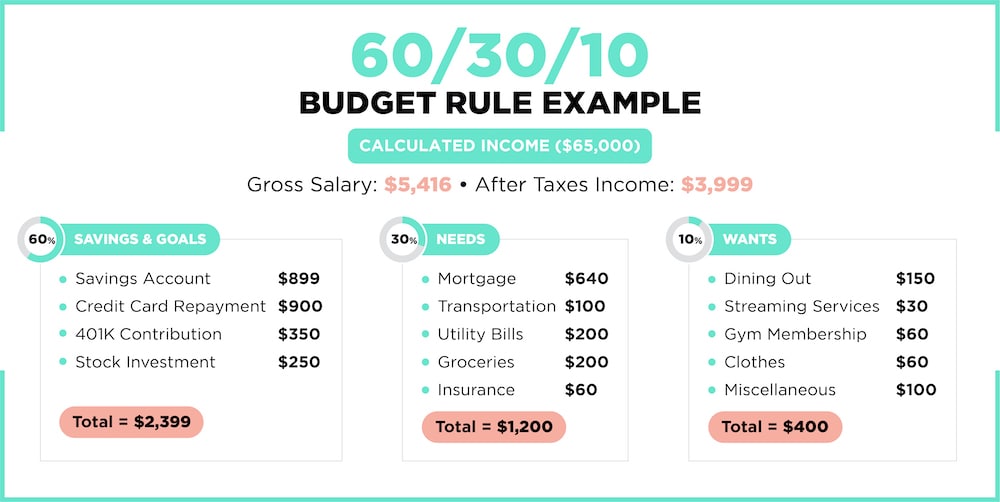
The 60/30/10 Rule
The 60/30/10 ruledivides your income into three parts: 60% for essential expenses, 30% for discretionary spending, and 10% for savings.
Your essential expenses include housing, utilities, groceries, transportation, and insurance. The 30% discretionary portion covers entertainment, hobbies, dining out, and other non-essential purchases.
The remaining 10% goes straight to savings, whether that’s an emergency fund, retirement account, or other financial goals. This percentage might seem low, but it’s a starting point if you’re not saving anything right now.
This method offers a middle ground between aggressive saving and comfortable living. It lets you enjoy your money while still building some financial security.
The main issue is that 10% savings might not be enough to reach bigger financial goals quickly. You may need to increase that percentage as your income grows or expenses decrease.
The 30/30/30/10 Rule
The 30/30/30/10 rule creates four equal-ish categories for your money. You allocate 30% to housing, 30% to other essential expenses, 30% to discretionary spending, and 10% to savings.
Housing covers your rent or mortgage, property taxes, and home insurance. Other essentials include groceries, utilities, transportation, health insurance, and debt payments.
The discretionary category gives you room for wants like entertainment, shopping, and dining out. The final 10% goes to savings and investments.
This approach works if you want clear boundaries for different spending areas. It helps prevent housing costs from eating up too much of your income.
The weakness of this budget is the low savings rate. Ten percent might not build wealth fast enough for most financial goals, especially if you’re starting from zero.
Envelope System
The envelope system uses cash for different spending categories. You withdraw money and put it into separate envelopes labeled for things like groceries, dining out, and entertainment.
When an envelope is empty, you stop spending in that category until next month. This creates a physical limit that’s hard to ignore.
Most people use envelope budgeting for variable expenses where overspending happens easily. Fixed bills like rent and utilities can stay on autopay since those amounts don’t change.
This method works well if you’re a visual person or tend to overspend with credit cards. The physical act of handing over cash makes spending feel more real.
The drawbacks include safety concerns about carrying cash and missing out on credit card rewards. Some people adapt this by using separate bank accounts or debit cards instead of physical envelopes.
Pay Yourself First Approach
The pay yourself first approach flips traditional budgeting upside down. You save moneybefore you pay any bills or buy anything else.
You decide how much to save each month for retirement, emergency funds, or other goals. That amount automatically transfers out of your checking account right after you get paid.
Everything left in your account after saving is yours to spend however you need. No detailed tracking required.
This method works great if you’re a natural spender who struggles to save. By removing savings money upfront, you’re forced to live on less without thinking about it.
The problem is that you need enough income to cover your basic expenses after you save. If money is already tight, you might not have anything to “pay yourself first” with until you increase your income or reduce expenses.
Tools, Templates, and Apps to Simplify Budgeting Finances
Technology makes budgeting faster and easier than ever before. Modern budgeting apps, spreadsheets, and automated tools help you track spending, save money, and reach your financial goals without the hassle of manual calculations.
Choosing the Best Budgeting App
The right budgeting app depends on your personal money management style. YNAB (You Need A Budget) works well if you want to give every dollar a specific job before you spend it. This method helps you plan ahead and avoid overspending.
EveryDollar uses a zero-based budgeting approach created by Dave Ramsey. The free version lets you manually enter transactions, while the premium version costs $17.99 per month and automatically syncs with your bank accounts.
PocketGuard shows you how much money you have left to spend after bills and savings. Simplifi by Quicken offers detailed reports and connects to your investment accounts. Empower (formerly Personal Capital) excels at tracking investments alongside your budget.
Key features to look for:
Automatic bank account syncing
Spending categories you can customize
Bill payment reminders
Credit score monitoring
Multi-device access
Most best budgeting apps offer free trials. Test a few options to find one that matches how you think about money.
Using Budget Templates and Spreadsheets
Budget templates give you a ready-made structure without monthly fees. Microsoft Excel and Google Sheets both offer free budgeting templates you can download and customize right away.
A basic budgeting spreadsheet should include your income, fixed expenses, variable expenses, and savings goals. You can add categories that matter to you and remove ones you don’t need.
Spreadsheets work well if you prefer hands-on control. You enter each transaction yourself, which helps you stay aware of where your money goes.
Many people find this manual process keeps them more accountable than automatic tracking.
Templates save setup time compared to creating a budget from scratch. Look for templates that calculate totals automatically and highlight when you go over budget in any category.
Albert Banking & Money App
Get up to $1,000 Instantly!
Albert:The only all-in-one banking and money app you need. Automatic saving and investing. 20% cash back on purchases and more!
Automating Savings and Tracking
Automation removes the effort from sticking to your budget. Set up automatic transfers from checking to savings right after payday. This “pay yourself first” approach ensures you save before you have a chance to spend.
Many budgeting apps like Rocket Money and Albert analyze your income and expenses to find safe amounts to save automatically. They move small amounts throughout the week without affecting your bill payments.
Automatic features that help:
Recurring transaction categorization
Spending limit alerts
Duplicate charge detection
Subscription tracking and cancellation
Wallet by BudgetBakers automatically categorizes your spending and shows your cash flow for the month. This helps you spot patterns without manually reviewing every transaction.
Auto-sync features connect your bank accounts, credit cards, and loans to your budgeting tools. This gives you a complete financial picture in one place. Most best budget apps sync with over 10,000 financial institutions.
Set Your Savings and Investments to Automatic with Acorns
Download the Acorns app, link it to your bank account and earn money while you sleep!
Combining different budgeting tools creates a stronger financial system. Use an app for daily tracking and a spreadsheet for long-term planning. Link your budget app to your bank’s automatic bill pay to avoid late fees.
Many budgeting apps now work with other financial services. You can connect investment platforms, retirement accounts, and even cryptocurrency wallets.
Empower is ideal because it gives you a money dashboard with this type of complete view.
Share your budget digitally with a partner or family member. Apps like Spendee and Goodbudget let multiple users access the same budget from different devices. Everyone sees updates in real time.
Tips for Sticking to Your Budget and Building Good Habits
Keeping a budget requires regular attention to where your money goes and making small changes to your daily choices.
Success comes from tracking what you spend, understanding why you spend it, and creating routines that support your money goals.
Track Your Spending Regularly
You need to record every purchase you make to see if you’re following your budget.
Write down each coffee, grocery trip, gas fill-up, and online order in a notebook or budgeting app. When you track spending daily, you catch problems before they get worse.
Set aside five minutes each day to log your expenses. This habit helps you spot patterns like overspending on weekends or impulse buys during lunch breaks.
Many people are surprised to learn they spend $50 more per week than they thought on small purchases.
Check your budget weekly instead of waiting until the end of the month. Break your monthly amounts into weekly chunks so you can pace yourself better.
If your grocery budget is $400 per month, that’s about $100 per week. This approach makes it easier to adjust before you run out of money.
Understanding and Adjusting Spending Habits
Your spending habits reveal what triggers you to buy things you don’t need. Do you shop when you’re bored, stressed, or hanging out with certain friends? Identifying these patterns helps you make better choices.
Look at your last month of expenses and circle purchases you regret. These show you where to focus your energy. Maybe you order food delivery when you’re too tired to cook, or you buy things on sale that you don’t actually use.
Create simple rules to change problem behaviors. If you overspend at Target, leave your cards at home and bring only cash for what you need.
When you want to buy something unplanned, wait 24 hours before purchasing it.
Plan for real expenses that happen throughout the year. Birthday gifts, car maintenance, and seasonal costs aren’t surprises when you prepare for them.
Add money to a savings category each month so these expenses don’t wreck your budget.
Building Consistency and Discipline
Financial discipline means doing what your budget says even when you don’t feel like it.
Start with one or two changes instead of trying to fix everything at once. Small wins build confidence and momentum.
Meal planning is one of the easiest ways to stick to your budget. When you know what you’re eating for the week, you spend less at the grocery store and avoid expensive takeout.
Make a list before shopping and don’t buy items that aren’t on it. Stick to a grocery list on a budget.
Use automatic transfers to move money into savings as soon as you get paid. This removes the temptation to spend that money on other things.
You’re still in control, but automation keeps you on track without requiring willpower every time.
Find someone who will check in with you about your budget each month. This could be your spouse, a family member, or a friend who also wants to improve their finances. Share your wins and struggles honestly so you both stay motivated.
Say “not this month” instead of “no” when you want something that’s not in your budget. This mindset shift helps you save up for things instead of going into debt.
Saying no to spending now means saying yes to bigger goals later.
Celebrate when you stick to your budget for a full month or pay off a debt. These wins deserve recognition because they represent real progress toward your financial goals.
Saving, Debt Repayment, and Achieving Financial Stability
Building financial stability requires you to balance three key areas:
These strategies work together to strengthen your financial foundation and reduce money-related stress.
Building an Emergency Fund
An emergency fund protects you from unexpected expenses like car repairs, medical bills, or job loss.
You should aim to save three to six months of living expenses in a place where you can access it quickly.
Start small if you need to. Even $500 can cover many common emergencies and prevent you from relying on credit cards.
Put this money in a high-yield savings account where it earns interest but remains available when you need it.
Calculate your monthly expenses including rent, utilities, food, and insurance. Multiply this number by three to find your minimum emergency fund goal. If your monthly expenses total $2,000, you need at least $6,000 saved.
Build this fund gradually by setting aside a fixed amount each paycheck. Consider this a bill you pay to yourself first, before other non-essential spending.
Automating Savings Strategies
Automatic savings removes the temptation to skip contributions. Set up automatic transfers from your checking account to your savings account right after each payday.
Many employers let you split direct deposits between accounts. Send a percentage straight to savings before the money reaches your main checking account. You won’t miss what you never see.
Choose a high-yield savings account for better returns on your money. These accounts often pay 10 to 15 times more interest than traditional savings accounts. Your emergency fund grows faster without any extra effort from you.
You can also automate retirement contributions through workplace plans or a Roth IRA. These automatic investments build your long-term wealth while you focus on daily expenses and debt repayment.
Paying Off Debt
Focus on high-interest debt first since it costs you the most money over time. Credit card debt often charges 15% to 25% interest, making it expensive to carry month after month.
List all your debts with their interest rates and minimum payments. Two popular strategies help you tackle debt repayment:
Avalanche Method: Pay minimums on everything, then put extra money toward the highest interest rate debt. This saves you the most money on interest charges.
Snowball Method: Pay minimums on everything, then focus extra payments on the smallest debt balance. This gives you quick wins that keep you motivated.
Make more than the minimum payment whenever possible. An extra $50 per month can cut years off your repayment timeline and save hundreds in interest.
Keep making minimum payments on all debts to protect your credit score while you focus extra money on your priority debt.
Planning for Future Investments
Financial planning extends beyond emergency funds and debt repayment. You need to think about retirement and other long-term goals even while managing current obligations.
If your employer offers a 401(k) match, contribute enough to get the full match. This is free money that immediately doubles your contribution. A 50% match on 6% of your salary means you instantly earn a 50% return.
A Roth IRA lets your savings and investments grow tax-free for retirement. You can contribute up to $7,000 per year if you’re under 50.
The money you put in can be withdrawn without penalty for emergencies, though it’s best to leave it for retirement.
Balance retirement savings with debt repayment based on interest rates. If your debt charges 20% interest, pay that off before investing extra money.
If your debt is at 4%, you might invest while making regular debt payments since investment returns typically exceed 4% long-term.
Start small with future investments if money is tight. Even $25 per month in a retirement account adds up through compound growth over decades.
Setting Financial Goals That Motivate You
Your financial goals give your budget a purpose and help you stay on track when spending decisions get tough.
Goals work best when you break them into manageable time frames and make them specific enough to measure your progress. Use a goal planner like this to help you.
Short-Term vs Long-Term Financial Goals
Short-term financial goals are things you want to achieve within the next year.
These might include saving for a vacation, building a $1,000 emergency fund, or paying off a credit card. These goals keep you motivated because you can reach them quickly and see results.
Long-term financial goals take more than five years to complete.
Retirement savings and plans to build wealth fall into this category. You might also include buying a home or saving for a child’s college education.
Mid-term goals sit in between and usually take one to five years. These could be saving for a car down payment or paying off student loans.
Each type of goal serves a different purpose in your budget. Short-term goals give you quick wins that build confidence.
Long-term goals protect your future and help you build wealth over time. You need both types to create a balanced financial plan.
SMART Goal Setting
SMART goals are Specific, Measurable, Achievable, Relevant, and Time-bound. This framework turns vague wishes into concrete plans.
Instead of saying “I want to save money,” a SMART goal would be “I will save $3,000 for a vacation to Hawaii by December 2026.” This goal tells you exactly what you’re saving for, how much you need, and when you need it.
Make sure your goals are achievable based on your income. If you earn $3,000 per month, saving $2,000 monthly isn’t realistic. Start with smaller amounts you can actually set aside.
Your goals should also matter to you personally. Don’t save for retirement just because someone told you to. Think about what you want your life to look like at age 65 and let that vision drive your savings.
Aligning Goals with Your Budget
Your budget needs to fund your goals, not work against them. List your goals and assign a dollar amount to each one based on what you can afford.
Start by calculating how much you need to save monthly for each goal. If you want to save $6,000 for a vacation in 12 months, you need to set aside $500 each month. For retirement savings, many experts suggest saving 15% of your income.
Create specific budget categories for your goals. Label them clearly so you remember what you’re working toward. You might have categories like “Hawaii Vacation Fund” or “Retirement Account.”
When your budget feels tight, rank your goals by importance. Put essential items like emergency funds and retirement savings first. Delay less urgent goals like saving for a vacation until you have more room in your budget.
Frequently Asked Questions
Budgeting raises many practical questions, from choosing the right method for your situation to understanding how different rules work.
The answers often depend on your income level, goals, and whether you’re budgeting for yourself or a business.
What are some effective strategies for budgeting when you’re just starting out?
Start by tracking everything you spend for one month. Write down every purchase, no matter how small, so you know where your money actually goes.
Once you see your spending patterns, try zero-based budgeting. This method gives every dollar a specific job, whether that’s paying rent, buying groceries, or saving for a goal. You assign all your income to different categories until you reach zero.
Keep your budget simple at first. Don’t create too many categories or make complicated rules you won’t follow.
Check your budget once a week. Spend 15 to 30 minutes looking at what you spent and adjusting your plan if needed.
Can you explain the 50/30/20 rule for budgeting?
The 50/30/20 rule splits your after-tax income into three main parts. You put 50% toward needs, 30% toward wants, and 20% toward savings and debt payments.
Needs are things you must have to live. This includes rent, utilities, groceries, insurance, and minimum debt payments. These expenses should take up half of your income.
Wants are things you enjoy but could live without. This category covers eating out, streaming services, hobbies, and shopping for fun. You get 30% of your income for these items.
The final 20% goes to savings and paying off debt faster than required. You can build an emergency fund, save for retirement, or make extra payments on credit cards or loans.
How do I create a monthly budget that works?
List all the money you bring home each month after taxes. Include your main job, any side work, and other income sources.
Write down all your expenses from the past few months. Group them into categories like housing, food, transportation, and entertainment. This shows you what you actually spend.
Assign a dollar amount to each category based on your income and past spending. Make sure your total expenses don’t exceed your income.
Pick one method to follow, like zero-based budgeting or the 50/30/20 rule. Choose whichever feels easier for you to stick with.
Use a budgeting app or spreadsheet to track your spending throughout the month. Update it every few days so you don’t forget purchases.
Adjust your budget as you go. If you spend more in one category, take money from another category to balance it out.
What tips can you offer for budgeting on a low income?
Focus on covering your basic needs first. Pay for housing, utilities, food, and transportation before anything else.
Look for ways to reduce your biggest expenses. This might mean finding a roommate, using public transportation, or shopping at cheaper grocery stores.
Cook meals at home instead of eating out. Making your own food costs much less and gives you more control over your budget.
Build a small emergency fund even if you can only save $10 or $20 a month. Having any backup money helps when unexpected costs come up.
Take advantage of free resources in your community. Libraries, food banks, and local assistance programs exist to help people manage tight budgets.
Use the envelope method with cash for categories where you overspend. When the envelope is empty, you stop spending in that category for the month.
What is the best way to prepare a company’s budget?
Start by reviewing your company’s financial data from the past year. Look at income, expenses, and any seasonal patterns in your business.
Set clear financial goals for the upcoming period. Decide what you want to achieve, like increasing revenue, cutting costs, or expanding operations.
Estimate your expected income based on past performance and market conditions. Be realistic rather than overly optimistic.
List all your fixed costs like rent, salaries, insurance, and loan payments. These amounts stay the same each month and must be paid.
Calculate your variable expenses such as supplies, marketing, and utilities. These costs change based on business activity.
Include money for unexpected expenses and opportunities. A contingency fund helps your business handle surprises without derailing your entire budget.
Get input from department managers who understand their area’s needs. They can provide accurate estimates and help create a budget everyone can follow.
Review and adjust your budget quarterly. Business conditions change, so your budget should be flexible enough to adapt.
Final Thoughts on Budgeting Finances
Budgeting your money is a simple process that can help you control your money, set a roadmap for meeting your goals and find your way to financial freedom!
Get started today, your bank account will thank you!
Most people don’t skip self care because they don’t care — they skip it because they don’t know what they need in the moment.
A selfcare menu removes decision fatigue by organizing care into categories based on emotional states. Instead of asking, “What should I do?” you simply choose from a prepared list.
In our original guide to calming routines, we mentioned pre-deciding your care, and now we’re diving into how to create a personalized self care menu that removes decision fatigue and makes choosing easier.
This guide walks you through building one that fits your real life.
Teach readers how to label their emotional state first before choosing.
Step 4: Keep the Menu Realistic
Limit Each Category to 5–8 Options
Too many choices recreate overwhelm.
Remove Anything You Never Actually Do
If you never take baths, don’t put baths on the menu.
Review Monthly
Update based on season and energy shifts.
Step 5: Turn It Into a Physical Reminder
Ideas:
Print and frame it
Add it to a planner
Create a notes app version
Keep it inside a journal
Consistency comes from visibility.
Visual Tie-In: Café-style layout with headings and short bullet lines.
Common Mistakes That Make Selfcare Menus Fail
Making the list aspirational instead of realistic
Including tasks that feel like chores
Overloading categories
Forgetting to update it
Closing
Self care becomes easier when it’s already decided. A personal selfcare menu turns vague intentions into simple, repeatable choices — no overthinking required.
Most self care routines fail long before motivation does — they fail at the environment level.
If your space feels chaotic, harsh, or uninspiring, your brain resists staying there. A self care aesthetic isn’t about perfection — it’s about designing an environment that gently invites you in.
In our roundup, we noted that friction often sabotages consistency, and now we’re diving deeper into how to design a self care aesthetic and ritual space that makes showing up feel natural.
This guide walks you through building a ritual space that supports consistency.
When weeks spiral, it’s usually not because you’re lazy — it’s because there was no reset point.
In our roundup, we touched on how calm mornings start before Monday, and now we’re breaking down the full Sunday reset framework that helps you regulate, organize, and plan your week with intention.
A Sunday self care reset gives your body, space, mind, and calendar a clean starting line so Monday doesn’t feel chaotic. This guide walks you through a simple 4-block structure you can repeat every week.