How to Set Goals
Sure, you have goals. Everyone does. There is a big difference, however, between goals and goal setting.
Read More

Sure, you have goals. Everyone does. There is a big difference, however, between goals and goal setting.
Read More

Everyone tells you to “be disciplined.”
You’ll hear it in every motivational clip, see it in every quote post, and read it in every “how to succeed” book. But if we’re being real, most of that advice is surface level. It sounds good. It feels good. But it doesn’t actually show you how.
“Wake up at 4 AM.”
“Do hard things.”
“Grind.”
That’s not a strategy. That’s a slogan.
Discipline isn’t about waking up early just to feel productive. It’s not about beating your chest to prove you’re tougher than yesterday. It’s not even about stacking a bunch of hard things together.
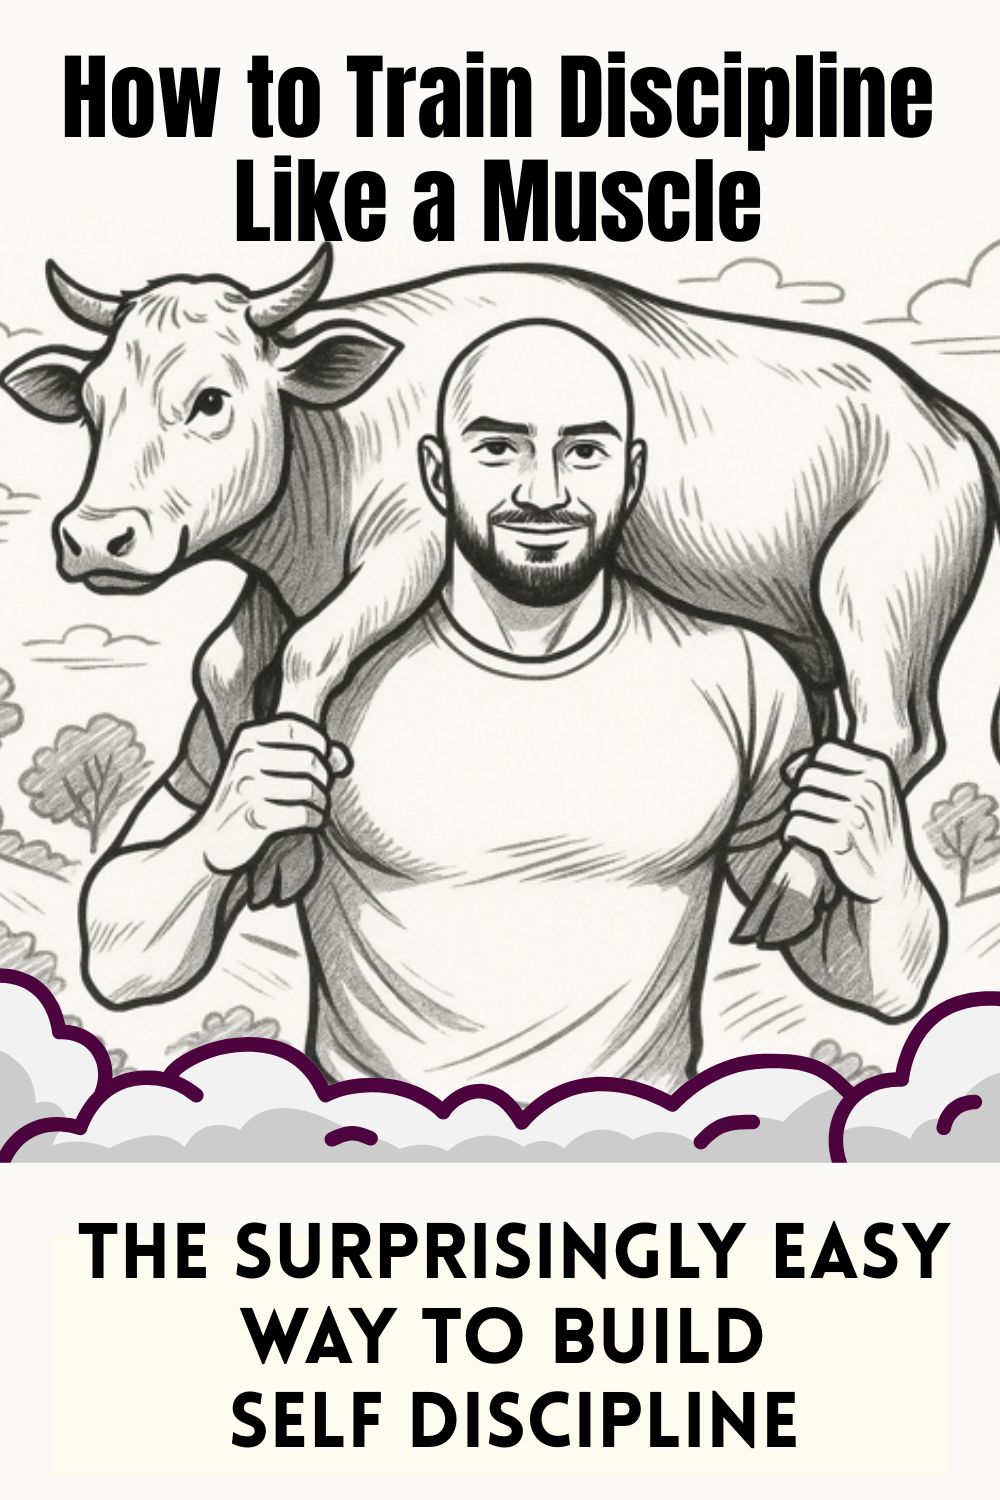
The truth is simple: discipline is a muscle.
And just like any muscle, it only grows when it’s under tension long enough to adapt and get stronger. The problem is most people train it the wrong way. They think doing one intense thing for an hour is the same as being disciplined. But real discipline isn’t built in that single hour. It’s built in the hours between the moments of intensity. It’s built in silence. In resistance. In those little micro-decisions you make when no one is watching.
I’ve been on this journey for a long time, fifteen years of chasing success, failing forward, figuring out what actually works. And if there’s one thing I’ve learned, it’s this: discipline isn’t about trying harder. It’s about training smarter. It’s about learning how to create the conditions that make discipline automatic instead of something you have to hype yourself up for.
If you want to get more from your life, and are looking for concrete action steps to get you there, check out our
Request a Coach page. It’s a “cut the fence-sitting and take action” way to tackle your issues and actually find success.
To get off the fence and start to take action,
click or tap here.

That’s what this article is about. I’m going to walk you through how to actually build discipline in a way that sticks, not a quick burst, not a motivational high, but real, unshakable discipline that stays with you.

Most of the advice out there glorifies intensity. Go harder. Push longer. Grind. The problem is, doing hard things typically only lasts 15 minutes to maybe 2 hours. That’s not enough time under tension to create real, lasting discipline.
And here’s the other trap: doing hard things can still give you a dopamine rush. You’re still chasing a reward. You might feel proud after the workout or focused during the hustle, but that’s not discipline, that’s dopamine doing its job. True discipline lives in the gap between what you want to do and what you choose to do.

If you really want to build discipline fast, stop focusing on doing hard things. Start by not doing the easy things.
Here’s how you do it:

This is where the real magic happens. You’re not just resisting for a few minutes or a couple of hours. You’re putting your discipline muscle under tension all day, every day. Every hour you don’t give in, that muscle grows stronger. And when you conquer the thing that once controlled you, everything else gets easier.
Once you can walk past your biggest craving without blinking, doing hard things becomes light work.

There’s a story about Milo of Croton, a Greek wrestler who got strong by carrying a baby calf every day. As the calf grew, his strength grew too. One day, he was carrying a full-grown cow.
If you want to get more from your life, and are looking for concrete action steps to get you there, check out our
Request a Coach page. It’s a “cut the fence-sitting and take action” way to tackle your issues and actually find success.
To get off the fence and start to take action,
click or tap here.
That’s discipline. You don’t start by carrying the cow. You start by picking up the calf.
The same applies to your discipline. You don’t start with 16-hour workdays. You start with what I call your crappy minimum. That might mean focusing for 30 minutes a day, working out for 5 minutes, or cutting one bad habit out of your week.
Then you build. Week by week, you add more weight. You push your threshold a little further. Over time, what used to feel hard becomes second nature.

Every single one of us has a willpower battery. Some people have a bigger one because they’ve trained it longer. Others have a smaller one because they’ve never used it. Either way, it’s real, and it drains throughout the day.

There’s a famous study referenced in Thinking, Fast and Slow about people who had to resist eating cookies. After resisting temptation, those people performed worse on self-control tasks that followed. Their willpower was depleted.
That’s how discipline works. The more you train it, the bigger your battery gets. The less you use it, the weaker it becomes. The goal isn’t to never run out of energy. The goal is to build capacity.

We respect resistance training for the body. We accept that building muscle takes time, pain, and patience. But when it comes to the mind, most people run from resistance.
Discipline is mental resistance training. It’s not punishment. It’s not about living like a monk. It’s about being able to say “no” to yourself and mean it.
If you want to get more from your life, and are looking for concrete action steps to get you there, check out our
Request a Coach page. It’s a “cut the fence-sitting and take action” way to tackle your issues and actually find success.
To get off the fence and start to take action,
click or tap here.
And here’s the real kicker, doing hard things can still give you dopamine. But discipline is what happens when dopamine isn’t present. When there’s no rush. No hype. Just quiet resistance.

Sometimes it can be helpful to have someone guide you through this process, consider hiring a life coach.

Real discipline isn’t about being intense. It’s quiet. It’s not about crushing it every day. It’s about showing up, saying no to your impulses, and stacking wins over time.
When you master denying yourself the thing you crave most, everything else in your life gets easier. The hard stuff becomes easy. The distractions lose their grip.

Discipline isn’t just about what you do. It’s about what you don’t do.
And once you get that, discipline stops being something you chase. It becomes part of who you are.
If you want to get more from your life, and are looking for concrete action steps to get you there, check out our
Request a Coach page. It’s a “cut the fence-sitting and take action” way to tackle your issues and actually find success.
To get off the fence and start to take action,
click or tap here.

There’s a moment in every healing journey where doing more stops working.
You’ve read the books, made the vision board, said the affirmations. You’re trying so hard—and still feeling stuck.
That’s when the Law of Allowing gently steps in. Not to shame you. Not to tell you to try harder. But to offer a different kind of power:
The power of letting go.
The power of making space.
The power of not resisting what already wants to find you.
The Law of Allowing is one of the most misunderstood parts of manifestation. It’s not passive. It’s not lazy. And it’s definitely not about giving up.
It’s about trusting the process enough to stop gripping it.
In our original roundup, The Law of Attraction: The Key to Automatic Happiness, we touched on the importance of releasing control. Now, we’re exploring how the Law of Allowing helps you soften resistance and create space for what’s already on its way.
Need some in depth spiritual and wellness guidance? Drop on by our directories choc full of law of attraction coaches, and spiritual coaches. If you’re manifesting your next big move, we’ve got someone for you. Or click here and we’ll match you with your perfect coach.

Here’s what the Law of Allowing really means—and how it might be the missing piece in your journey to alignment.
You can have a clear vision and still let go of the exact timeline.
You can take aligned action without micromanaging every outcome.
Control often comes from fear. From past wounds that taught you things only happen if you push. But the Law of Allowing says: You are not the only one doing the work.
Sometimes your job is to step back so the path can become visible.
To stop refreshing the outcome.
To stop asking, “Is it working yet?” and start trusting that something is already working on your behalf.

Think of your desires like packages trying to be delivered to your door.
If you’re too busy blocking the entrance with fear, doubt, comparison, or trying to “earn” your worthiness… there’s nowhere for them to land.
The Law of Allowing invites you to clear emotional space.
To unclench your jaw.
To say, “I’ve done my part. Now I allow what’s meant for me to come forward.”
This isn’t weakness. This is energetic maturity.

Resistance doesn’t just block joy—it builds tension in your body, your mind, and your energy.
Have you ever noticed that the more you obsess over something not happening, the more anxious you feel—and the more blocked everything becomes?

That’s not a coincidence.
That’s a feedback loop.
The Law of Allowing helps you step out of it.
Allowing means feeling what’s here without judgment.
Letting yourself want what you want without apology.
And making peace with what hasn’t happened—yet.

This law is often misunderstood as “just go with the flow” or “let people treat you however.”
Absolutely not.
Allowing isn’t the same as accepting less. It’s about knowing the difference between aligned effort and unnecessary struggle.
It’s about recognizing when something is hard because it’s growing you—and when it’s hard because it’s wrong for you.
The Law of Allowing teaches you to stop swimming upstream when the current is already carrying you somewhere better.

If you’ve been efforting, forcing, or overthinking, it’s okay to pause.
To breathe.
To say, “I’ve done enough today.”
Allowing means you trust that your energy—not just your effort—is shaping your life.
You don’t need to always know what’s next.
You just need to be open enough to receive what’s trying to find you.
 Final Reflection
The Law of Allowing asks you to soften.
To loosen your grip on how it has to go.
To stop trying to manifest from a place of panic, and instead remember that alignment never feels like war.

What’s meant for you isn’t waiting for you to become someone else.
It’s waiting for you to stop resisting who you already are.
Let the good find you.
Let the clarity rise up without being forced.
Let the love land where your guard used to be.
You don’t have to chase the life you want.
You just have to stop closing the door every time it knocks.

The post The Law of Allowing: You Don’t Have to Force It to Receive It appeared first on Life Coach Hub.
Follow these three simple steps to bring what you want into your life by learning how to use the law of attraction.
Read More

Want to try this at home? No worries! Download a copy of our SMART Goals PDF Worksheet.
Need some in depth help with goal settings, motivation or productivity ? Drop on by our directories choc full of productivity coaches, accountability coaches, and goal-setting coaches, and start reaching those goals! Or click here to have us match you to the best.
Setting goals helps us turn our dreams into reality. I’ve always said that a goal is a dream that you’ve written down.

Goals help to keep you accountable and help you to stay on track. Written goals are like your road map on a long trip, you locate your destination, plot your route, and check the map along the way to make sure you’re still headed in the right direction.

When you’re setting goals, you want to make sure they will actually take you somewhere, so they need to be smart goals.

So here’s how that looks. If I want to help my child set a goal for this school year, I wouldn’t want them to say “My goal is to do well this year”. You would want them to to phrase the goal in this way:

I will pass all my classes with a B average and a 3.5 GPA in the 2013 – 2014 school year.
This goal is specific (all courses, B average, 3.5 GPA), measurable (you can easily measure grades and GPA), achievable (my child is smart enough and has the resources he needs), relevant (this fits within his life), and timely (2013-2014 school year).

One of the biggest reasons goals fade away is simply because we forget about them. Life gets busy, distractions pile up, and even the most exciting intentions can disappear into the background. That’s why making your goals visible matters.

When you place your goals where you’ll see them daily—on your fridge, desk, phone lock screen, planner, or bathroom mirror—they stop being abstract ideas and become part of your environment. Visibility creates accountability without pressure. It reminds you of what matters, keeps your focus sharp, and nudges you back on track when life pulls you in other directions.
Your mind will move toward whatever it sees often. Let your goals be the first thing you see, not the thing you remember later.

Most people wait to celebrate until the goal is completely accomplished—but that approach drains motivation and makes the journey feel heavier than it needs to be.
The truth is, progress is built in tiny increments. Sending the email, reading one chapter, walking for ten minutes, cleaning one drawer, saving five dollars—these small actions matter. They tell your brain, “I’m doing it. I’m becoming the person who follows through.”

Celebrating micro-wins reinforces the behavior you want to repeat. It doesn’t have to be dramatic—sometimes it’s as simple as checking off a box, taking a breath of pride, or acknowledging your effort. When you honor the small steps, you train yourself to keep going.

Your next step would be to break that large goal down into smaller stepping-stone goals. Think of them as reference points on your map to your final destination. “Bites of the elephant”

Making, writing, and activating goals will help take you from STUCK to SUCCESS.

Want to try this at home? No worries! Download a copy of our SMART Goals PDF Worksheet.
Need some in depth help with goal settings, motivation or productivity ? Drop on by our directories choc full of productivity coaches, accountability coaches, and goal-setting coaches, and start reaching those goals! Or click here to have us match you to the best.
The post Why Set Goals? appeared first on Life Coach Hub.
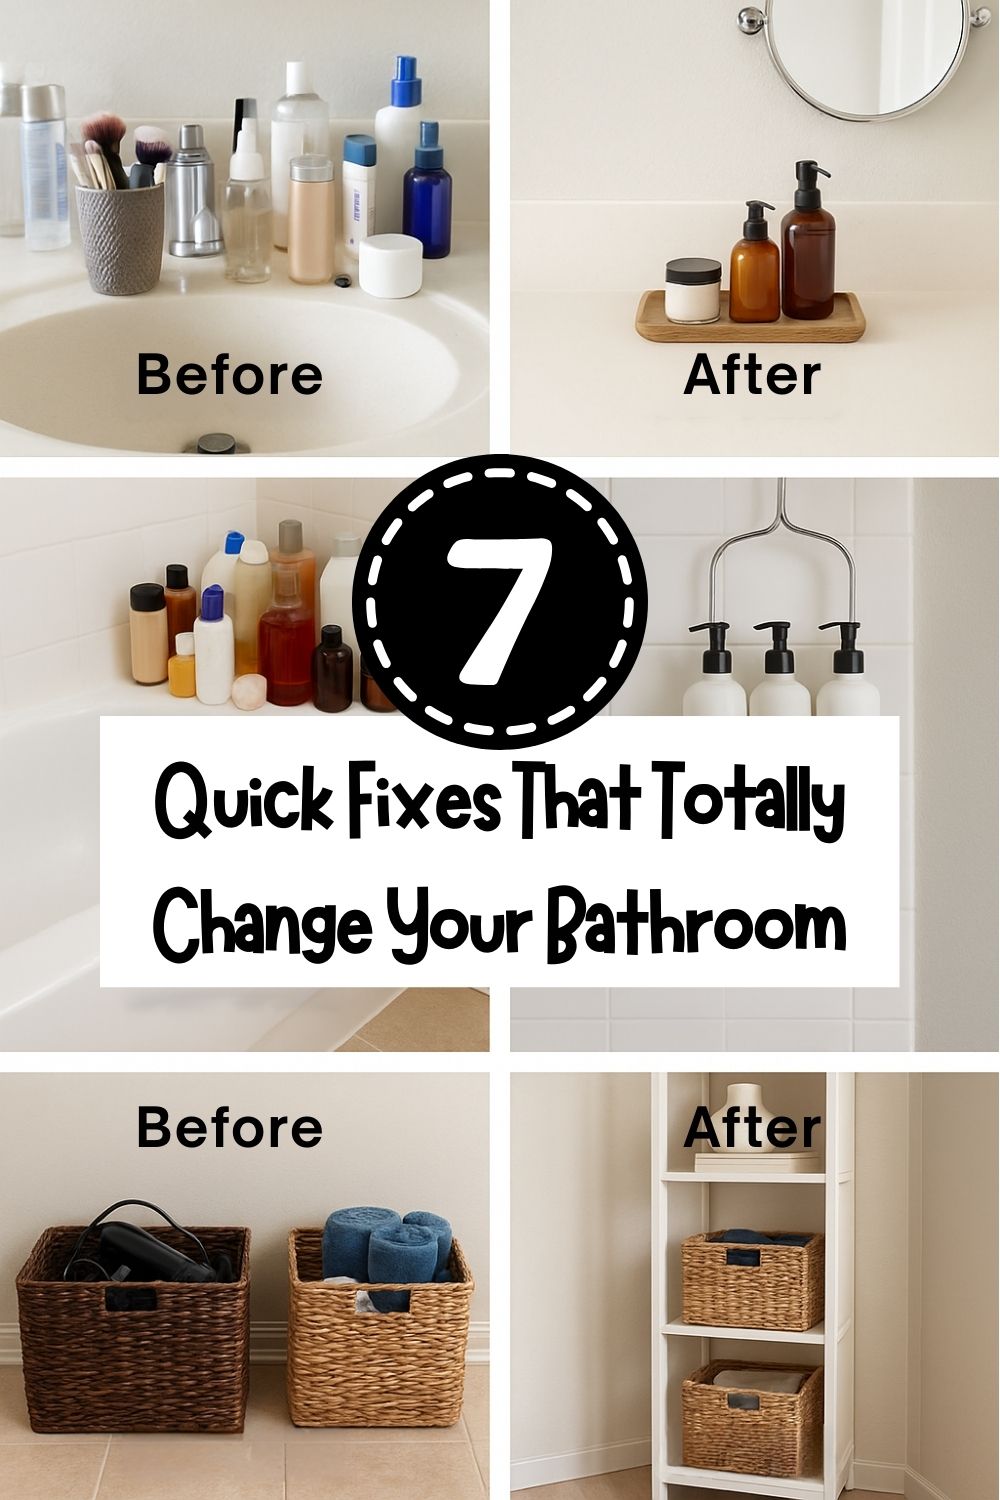

If your small bathroom feels more like a daily source of stress than a soothing space, you’re not alone. Tiny bathrooms have a way of collecting clutter, swallowing storage, and leaving you feeling overwhelmed before you’ve even had your morning coffee. But here’s the good news: you don’t need a full renovation to see a real difference.
Need some in depth help with organization and productivity ? Drop on by our directories choc full of productivity coaches, accountability coaches, goal-setting coaches, time management coaches and even work/life balance coaches to get your life organized! Or click here to have us match you to the best.
These quick, low-cost transformations target the most common problem areas—from chaotic counters to crammed shower ledges—and turn them into calm, functional spaces you’ll actually enjoy using. Ready to see what a one-day glow-up can do? Let’s get into it.

It happens fast: a few makeup items here, a toothbrush holder there, and suddenly your bathroom counter is overflowing. The problem isn’t your habits—it’s the layout. Small bathrooms leave little room for spread, but plenty of room for smart vertical storage.
The fix? Add a slim, tiered vertical organizer beside your mirror or on the wall above your sink. Think: acrylic shelves, wire baskets, or floating ledges that match your existing fixtures.
They keep your daily-use items like serums, creams, and tools within reach but off the surface. You can even color-code bins or label each shelf for different categories—skincare, morning routine, makeup.

The psychological shift is real. A clean counter creates the illusion of a larger space, helps you move through your routine faster, and gives your brain a visual sigh of relief. You go from “Where did I put my concealer?” to “Ah, there it is.”
Don’t forget to declutter as you go. Toss expired products, group similar items together, and leave a small decorative touch—like a candle or plant—to keep things feeling intentional rather than purely utilitarian.
Want step-by-step instructions and product ideas? Check out the full DIY breakdown here.

Over-the-door towel racks often feel like a necessary evil in tiny bathrooms. They sag, clang, and create a cluttered look without offering real utility. But you don’t have to settle for function over form.
A simple mounted hook rail can instantly elevate your space. Look for sleek options in wood, matte black, or brushed gold finishes.
You can place them on the back of the door or directly on the wall near your shower or sink. Hooks work better for airflow, dry faster, and feel more like a boutique spa than a college dorm.

For added style points, hang towels in a coordinated color palette and roll up extras in a decorative basket nearby. This small change has a big visual payoff. It frees up the door swing, creates a designated spot for every towel, and just looks intentional.
You’ll be surprised at how this one tweak upgrades the entire bathroom vibe—especially when paired with upgraded towels or robe hooks.
We walk you through hook height, spacing, and our top product picks in the full tutorial here.

If you dread opening your under-sink cabinet, you’re not alone. The space is often an awkward mess of half-empty bottles, mismatched bins, and forgotten cleaning products. That’s because most people treat it like a storage bucket instead of a usable zone.
Transform it with sliding bins or stackable drawers. These turn your cavernous, cluttered cabinet into a functional mini-pantry. You can group items by use—like hair tools, backstock, and cleaners—and reach them without knocking everything over.

Clear bins make it easy to see what you have. Add stick-on labels for categories, and use tension rods or vertical dividers to separate tall bottles. If your plumbing setup is tight, go for short drawers or pull-out trays that work around the pipes. It’s not about stuffing more in—it’s about making what’s there easy to access.
This simple fix cuts down on duplicates, forgotten items, and last-minute store runs. You’ll save time, money, and sanity.
Ready to overhaul your cabinet? Our full step-by-step guide with organizer recommendations is here.

Most people overlook the top of the toilet tank, using it for nothing or worse—piling random products and empty rolls. But this little shelf is actually prime real estate for both function and charm.
Start with a small tray that fits the tank lid. Then add a curated combo: a rolled towel, a plant or candle, and one or two necessities like an air freshener or extra TP.
This setup looks intentional, adds vertical interest, and keeps everyday items within reach without feeling cluttered.
Trays work wonders because they set visual boundaries. Even if the items are ordinary, the tray makes them look styled. Choose materials that match your bathroom vibe—bamboo, ceramic, woven wicker.
You can even rotate this mini vignette seasonally or theme it by mood: spa day, cozy winter, spring refresh. Suddenly, your toilet corner isn’t an afterthought—it’s a Pinterest-worthy detail.
We show you how to build a styled tank tray with different material combos and layout ideas here.

Few things make a bathroom feel messier than bottles piled in every corner of the tub. That shampoo pyramid? Not helping. The solution lies in better vertical storage.
A rustproof hanging caddy with tiered shelves, hooks, and drainage holes can change everything. Look for one that mounts over the showerhead or attaches via suction to tile. Then, decant your shampoo, conditioner, and body wash into uniform squeeze bottles with labels.

This one switch transforms your shower from cluttered chaos into a spa-like setup. It also saves time during your routine and makes cleaning easier. Don’t forget to toss empty bottles, expired products, and anything you haven’t used in months.
Bonus points for adding a eucalyptus bundle or waterproof Bluetooth speaker to complete the vibe.
Want our picks for non-slip, rustproof caddies and bottle labeling tips? Full breakdown here.

Using the floor as storage might seem convenient, but it quickly becomes chaotic. From laundry baskets to stacked bins, it clutters visual lines and eats up your limited square footage.
Instead, go vertical with a slim tower shelf or narrow cabinet. Look for designs under 12 inches wide that fit in awkward corners or next to the sink or toilet.
Open shelving lets you style with rolled towels, labeled bins, and decorative jars. Closed cabinet styles keep things looking clean and minimal.

This shift lifts your storage off the floor and gives everything a “home.” Use baskets on each shelf to group items and make clean-up easier. Add subtle lighting or a small plant to soften the structure and create balance.
You’ll be amazed how a single piece of furniture can declutter the entire room.
Find our top space-saving tower shelves and styling examples here.

Traditional towel bars are notorious for not doing their job well. Towels slip off, bunch up, and never quite dry. In small bathrooms, they often dominate the wall without delivering results.
Replace that underwhelming bar with individual wall hooks or a hook rack. Hooks allow for better airflow, take up less space, and look more intentional—especially when styled with matching or coordinated towels.
Place them staggered for visual interest, or line them up in a neat row. Want to go bold? Use statement hooks in gold, matte black, or artisan ceramic. For families, label each hook or assign one per person.
This tiny switch improves both function and flow. It makes drying easier, keeps towels off the floor, and turns an everyday necessity into a design element.
Need help choosing the right hook layout and finding renter-friendly options? Our full how-to is here.
If this list got you excited about quick wins and space-saving upgrades, you’ll love these next-level DIYs. Each one is packed with smart tricks to make your bathroom more functional (and beautiful) without a full remodel:
The post Before & After: Tiny Bathroom Transformations You Can Do in a Day appeared first on Life Coach Hub.
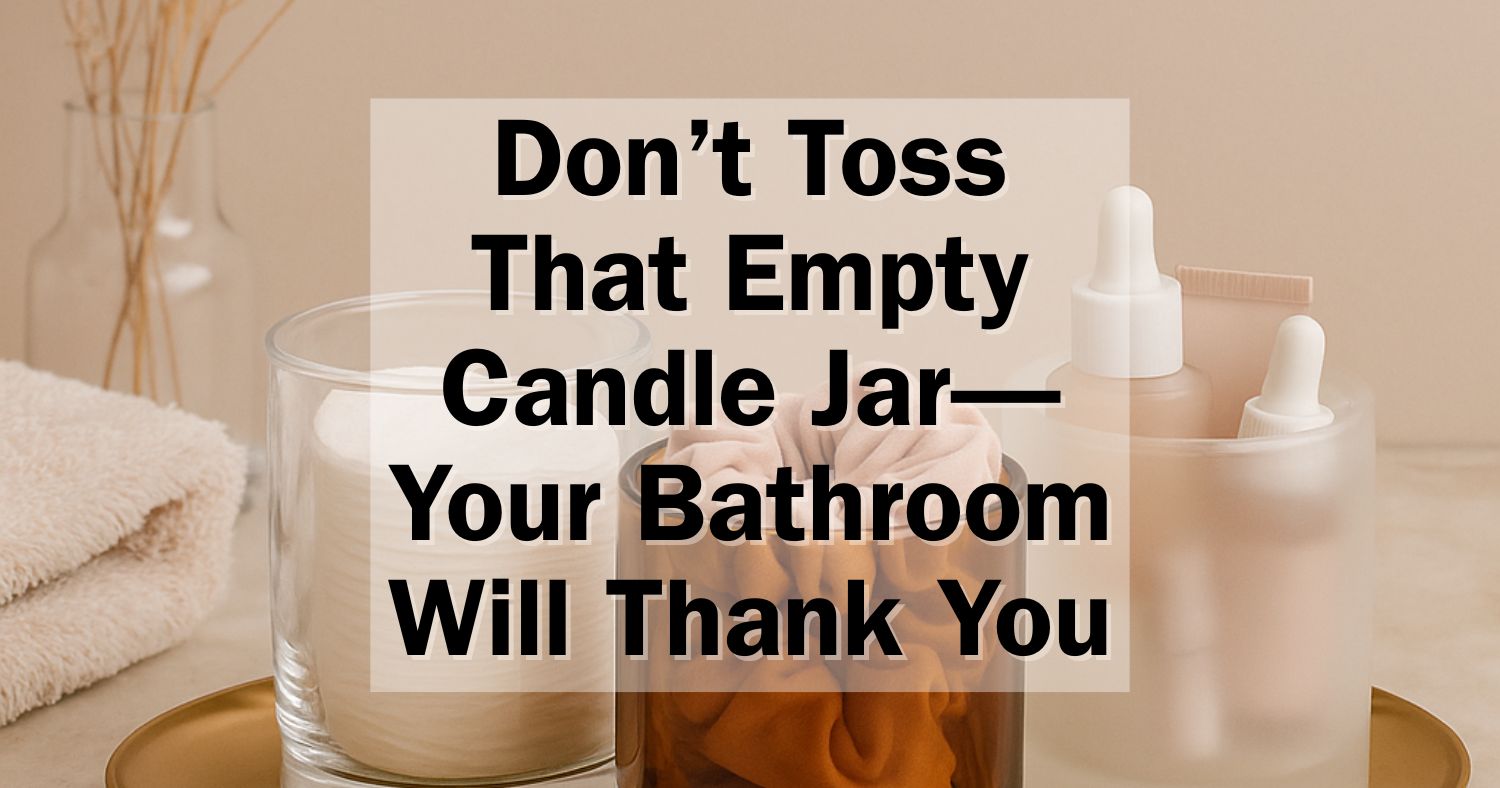

There’s something satisfying about finishing a candle. You enjoyed the glow, the scent, the vibe. But when the wax is gone and only the jar remains, most people toss it in the bin and move on. Not you.
You’re about to unlock one of the easiest, most aesthetic bathroom organization hacks: reusing candle jars.
Why? Because these jars are sturdy, beautiful, and already sized perfectly for countertop items you reach for every single day—cotton rounds, Q-tips, bath salts, scrunchies, mini skincare products, and more.

This cozy-meets-clever hack stole the spotlight in our original roundup—and for good reason. Here’s how to turn your finished candles into beautiful, functional containers that upgrade your countertop without spending a dime.

Need some in depth help with organization and productivity ? Drop on by our directories choc full of productivity coaches, accountability coaches, goal-setting coaches, time management coaches and even work/life balance coaches to get your life organized! Or click here to have us match you to the best.

Candle jars come in frosted glass, clear, amber, black, white ceramic, and everything in between. They already look expensive—because they were. So why not give them a second life?
When styled right, a repurposed candle jar gives your bathroom that spa-meets-Pinterest vibe—without costing a cent.


You don’t need to buy a single organizer to start decluttering your bathroom—you just need to stop throwing out the ones you already own. A candle jar is more than just a pretty shell—it’s a storage solution waiting for a second chance.

With a little cleanup and a few smart styling touches, that empty candle becomes your new favorite organizing tool. And your bathroom? It’ll look better every time you walk in.
The post Don’t Toss That Empty Candle Jar—Your Bathroom Will Thank You appeared first on Life Coach Hub.

Because sometimes, your vibe—and your tools—need to roll with you.
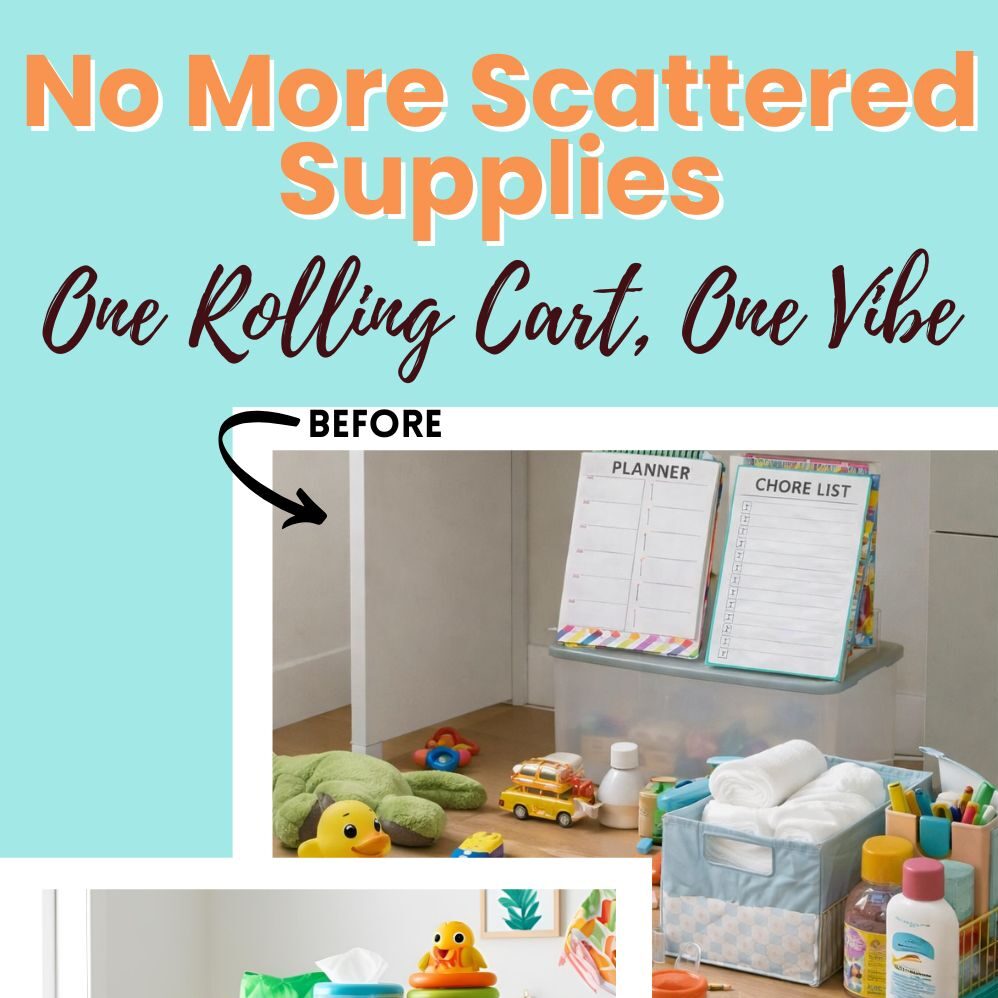
If your day flows from work to home tasks to a quick reset moment (and maybe back again), you don’t need more space—you need smarter storage. Enter: the Rolling Mood Cart. This Pinterest-worthy hack transforms a simple tiered cart into a flexible, styled-out mobile zone that shifts with your schedule and supports your energy.
Rolling Mood Carts got a lot of love in our advanced organization roundup—and now we’re rolling out (pun intended) our favorite setups for productivity, self-care, and everything in between.
Whether you need a mobile self-care sanctuary, a work-from-home survival kit, or a late-night creative corner, mood carts let you organize by purpose—not just category—and bring that purpose with you.
Need some in depth help with organization and productivity ? Drop on by our directories choc full of productivity coaches, accountability coaches, goal-setting coaches, time management coaches and even work/life balance coaches to get your life organized! Or click here to have us match you to the best.

Unlike static organization systems, mood carts are dynamic. They move from room to room, adapt to your routines, and keep your essentials organized without taking up much space.
They work especially well for:
It’s also emotionally impactful: when your physical space reflects your current goal or mindset, it becomes easier to stay present, focused, or relaxed.
A flexible foundation you can expand or simplify:

Work Mode / Productivity Cart:

Self-Care / Glow-Up Cart:

Creative Mode Cart:

Mom Mode Cart:

Weekend Wind-Down Cart:

The easiest way to go from thinking to doing:

Step 1: Choose Your Focus
What kind of cart do you need right now? Productivity? Self-care? Pick one zone to build first.
Step 2: Gather Supplies
Collect everything you regularly reach for in that mode. Don’t overthink it—if you use it often, it belongs in the cart.
Step 3: Create Zones by Shelf
Step 4: Use Containers to Divide
Add small bins or trays so items stay sorted. Bonus if they match your color scheme.
Step 5: Label or Color-Code
Add minimalist labels or washi tape color indicators so you know what’s what at a glance.
Step 6: Style It Up
This isn’t a junk cart—add visual joy. A cute cup for pens, a framed mini print, a coordinated color theme.
Step 7: Park It or Roll It
Keep it near your workspace or roll it wherever you’re spending time. That’s the beauty of it—it adapts to you.

Mood carts are about more than organizing—they’re about supporting your energy. When everything you need is in one mobile zone, you cut decision fatigue and streamline your habits.
No more hunting for your journal. No more digging for your charger. Just one cart, one purpose, and a moment of peace (or power).
And the best part? When life changes, your cart can too.
We’ve gathered the trays, bins, and accessories that make setting up your rolling cart quick and customizable. Just load, roll, and reset as needed.
Need extra space that moves with you? A mobile cart is perfect for everything from work supplies to self-care staples. Here are the essentials to help you build a cart that supports your day, wherever it takes you.

If you need an easy way to organize your supplies and move them around, this cart works well for most home and office needs.
Pros
Cons
I put this cart together in about 20 minutes and didn’t need much help from the instructions. All the hardware and tools you need come right in the box. Even if you’re not used to building things, you’ll find it simple.
Rolling the cart feels effortless, even when it’s full of art supplies or books. Two of the wheels lock, so you don’t have to worry about it drifting away. The extra cups and hooks are handy for items you use all the time, like pens or scissors.
If you mostly need to organize light to medium-weight items, you will probably find this cart helpful. The baskets aren’t deep, but there is plenty of room for most craft materials, snacks, or small kitchen gadgets.

This cart is a good pick if you want something roomy, easy to move, and handy for organizing many types of supplies.
Pros
Cons
Your things will find a home in the DTK mobile cart. I fit notebooks, art supplies, and snacks with no problem, using the top shelf for quick grab items and the side bag for hidden clutter. The deep trays keep small things from falling out, so you won’t chase items around your room.
Assembly took me about twenty minutes with the tool that came in the box. The instructions were clear, and the extra screws helped me feel prepared. While the metal is not the thickest, it did the job for my light and medium-weight items.
The smooth-rolling wheels made it easy to push from my kitchen to the living room. Locking the wheels kept the cart steady while I worked. Overall, this DTK cart is great if you’re seeking affordable, flexible storage with a few minor blemishes.

If you need a strong and handy cart for home or office, this one does the job well.
Pros
Cons
When I put the YASONIC cart together, it took less than 20 minutes with the instructions. The metal frame feels tough, and the baskets hold books, snacks, and cleaning supplies with no problem. I liked that the wheels glide over carpet and tile without sticking.
You get three baskets, plus hanging cups and hooks that help with extra storage needs like pens or cables. Using the cart around the house, I was able to move it from kitchen to office without struggling.
You should know the baskets aren’t completely closed off, so tiny items can slip through the mesh. For most everyday things, though, this cart keeps everything organized and easy to move.

This folding cart is a solid pick if you want something you can move around easily and store without hassle.
Pros
Cons
Using this cart, you’ll notice right away that it doesn’t take much effort to open or close. You can roll it through narrow hallways or busy rooms, then fold it up and tuck it behind a door or in the trunk of your car when you don’t need it.
The handles are easy to hold. I’ve pushed it for a while without feeling sore wrists or achy fingers. It’s handy for carrying groceries, small tools, or bins, and you have three shelves to spread things out.
Keep in mind you can’t overload it, and if you roll over carpet or uneven floors, the wheels might snag a little. If you want a cart that’s easy to bring out, load up, and put right back away, this one is worth a look.

If you need a reliable rolling cart for technology and supplies, this one is a solid choice because it holds a lot and moves smoothly.
Pros
Cons
Moving this cart from classroom to office is simple thanks to its sturdy handle and four caster wheels. You can load it up with equipment or supplies, and it still maneuvers without trouble. The built-in power strip is handy for charging laptops or projectors right on the cart.
You get three shelves that adjust quickly, so you can set it up to fit big or small items. It holds up to daily bumps and is easy to wipe clean if spills happen. If you switch locations or storage needs change, it’s easy to reconfigure.
Assembly only took about fifteen minutes, but you may want a mallet for snapping the parts in place. If you need a plug that isn’t US standard, keep in mind that the included power strip may not work for you. Overall, it’s great for anyone needing portable storage with charging options.
When choosing a mobile cart, think first about what you plan to use it for. Make a list of tasks to help you know what size and features you need.
Key Features to Look For:
| Feature | Why it Matters |
|---|---|
| Size | Fits your space |
| Weight limit | Holds your supplies |
| Material | Affects strength |
| Wheels | Makes it easy to move |
Test the handle to see if it feels strong. Some carts include handles for easy pushing.
Check how easy it is to put the cart together. Some come with instructions or tools in the box.
Think about if you will use it indoors or outdoors. Some carts are better at handling rain or sun than others.
Choose a cart that matches your daily needs and tasks.
Get the other organization hacks here:
The post Rolling Zone Bins: Build Mobile ‘Mood Carts’ for Productivity or Self-Care appeared first on Life Coach Hub.
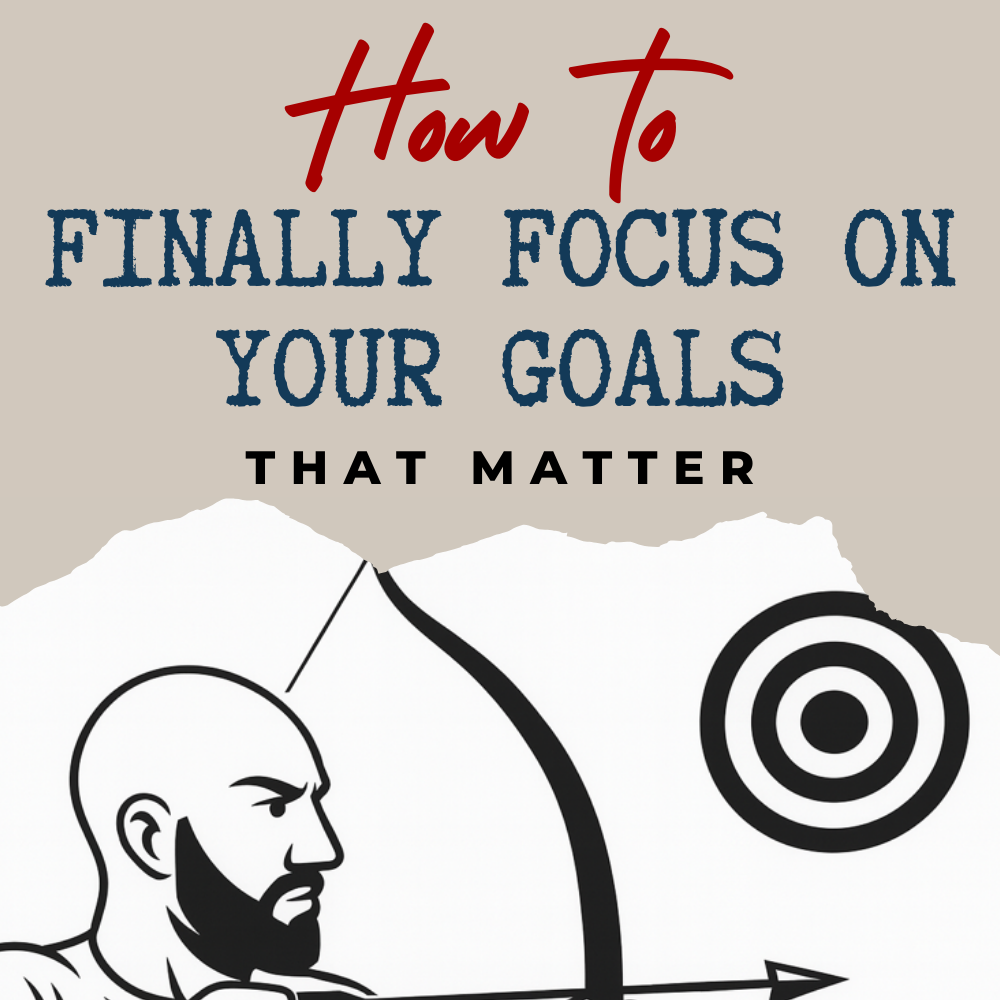

I’ve spent over 15 years chasing success. For the first decade, I stumbled through trial and error. The last five years, though, have been about building, growing, and helping others do the same. Through coaching countless entrepreneurs and high performers, I’ve learned something simple but brutal: most people don’t fail because they lack talent or opportunity. They fail because they can’t focus.
Whether it’s staying present in the daily grind or keeping your eyes on a bigger vision, focus is the foundation. In this guide, I’ll walk you through how I trained my mind to focus, without relying on pills or hacks that fade fast. We’ll cover the mindset, the physical side, and the daily systems that make it possible.
Need some in depth health and wellness guidance? Drop on by our directories choc full of wellness coaches, health coaches, fitness coaches, stress management coaches, and energy coaches to get your calm on. Or click here to have us match you to the best.

Read this all the way through. Each step might not seem life-changing on its own, but together they form a structure that works.

Step 1: Get Clear on Your Vision
You can’t stay focused if you don’t know why you’re focusing. Start by defining the destination. What’s the goal behind the work? What’s the bigger vision that drives you?
Write it down. Clarity turns decision-making into something simple: if it aligns with your vision, you do it. If it doesn’t, you don’t. That single shift will save you from a lot of mental noise.
If you can’t do it alone, consider hiring a life coach.
If you want to get more from your life, and are looking for concrete action steps to get you there, check out our
Request a Coach page. It’s a “cut the fence-sitting and take action” way to tackle your issues and actually find success.
To get off the fence and start to take action,
click or tap here.
Step 2: Dump Your Weekly To-Dos on Paper

A scattered mind comes from a scattered plan. Write out everything you think you need to do this week. Don’t worry about the order yet, just get it out of your head and onto paper or a spreadsheet. This step alone will give your brain some breathing room.
Step 3: Sort by Real Priority
Once everything’s in front of you, sort the list. What matters most? Rank tasks based on their actual impact, not how urgent they feel in the moment.

High priority means it significantly moves something forward or prevents something from falling apart. Low priority? That can wait. The goal here is to make sure your time goes to what actually matters.
Step 4: Estimate How Long It’ll Take
Next to each task, jot down a realistic time estimate. You don’t have to get it perfect, this is just to build awareness. Over time, your estimates will get sharper, and that will help you plan your days with precision.
If you want to get more from your life, and are looking for concrete action steps to get you there, check out our
Request a Coach page. It’s a “cut the fence-sitting and take action” way to tackle your issues and actually find success.
To get off the fence and start to take action,
click or tap here.

Create a simple daily grid broken into 30-minute blocks from the time you wake up to the time you wind down. Then, plug in your top-priority tasks first. Fill the rest of your day around them.
This is how you move from a reactive day to a structured one. It’s not about being robotic; it’s about protecting your mental bandwidth.
Step 6: Use a Timer to Get in the Zone
Download a focus timer on your computer, not your phone. Your phone is a distraction machine.

Set the timer for the amount of time you can actually stay on task before your mind starts wandering. For most people, that’s around 15 minutes when they start.
When the timer runs, you work. When it stops, you rest. No negotiations.
During breaks, do whatever resets your brain. I like push-ups or squats because it keeps my energy up. But if you need to stare at the wall or doom-scroll for five minutes, that’s fine. The key is strict separation between work and rest.
Step 7: Four Rounds, Then a Big Break
If you want to get more from your life, and are looking for concrete action steps to get you there, check out our
Request a Coach page. It’s a “cut the fence-sitting and take action” way to tackle your issues and actually find success.
To get off the fence and start to take action,
click or tap here.
Run four work blocks back to back. For example, four 15-minute sessions with short 3- to 4-minute breaks in between. After the fourth round, take a longer break, about two-thirds the length of your total work time.

As your focus muscles get stronger, those blocks can grow. I personally work best in 1-hour blocks followed by 15-minute breaks. But I started at 15 minutes. Progress beats perfection.
Step 8: Track Your Wins (and Misses)
After each session, quickly reflect. Did you stay focused the whole time? Did it fall apart halfway through? Color-code or mark each task:
This simple tracking habit reveals patterns fast. You’ll learn how long things actually take, how much you can realistically handle, and when to say “no” to more.
Step 9: Build Your Focus Like a Muscle

Once you’ve held the line for a week, slowly increase your work intervals. Find your personal sweet spot, the balance between maximum focus and diminishing returns. For me, that’s an hour.
This isn’t about perfection. It’s about gradual, consistent progress. Over time, the length and quality of your focused work will surprise you.
If you want to get more from your life, and are looking for concrete action steps to get you there, check out our
Request a Coach page. It’s a “cut the fence-sitting and take action” way to tackle your issues and actually find success.
To get off the fence and start to take action,
click or tap here.
Step 10: Sync Your Body with Your Schedule

Your biology is either your ally or your enemy. To make it work for you:

Why does this matter? Because your body’s rhythm sets the tone for your mind. People in highly structured environments, like prison, often build incredible discipline because their routines are locked in. You can create your own version of that structure without the bars.
Why This Method Works
Focus isn’t something you’re born with, it’s something you train. We live in the most distracted era in history. ADHD diagnoses have skyrocketed not because everyone suddenly developed attention issues, but because modern life is engineered to pull your attention in every direction.

This system works because it trains your brain the way you’d train your muscles. Short, focused bursts. Clear structure. Real breaks. Consistency over chaos.
If you give it a few weeks, you’ll see the difference, not just in how much you get done, but in how much calmer your mind feels.
If you want to get more from your life, and are looking for concrete action steps to get you there, check out our
Request a Coach page. It’s a “cut the fence-sitting and take action” way to tackle your issues and actually find success.
To get off the fence and start to take action,
click or tap here.
Welcome to WordPress. This is your first post. Edit or delete it, then start writing!